
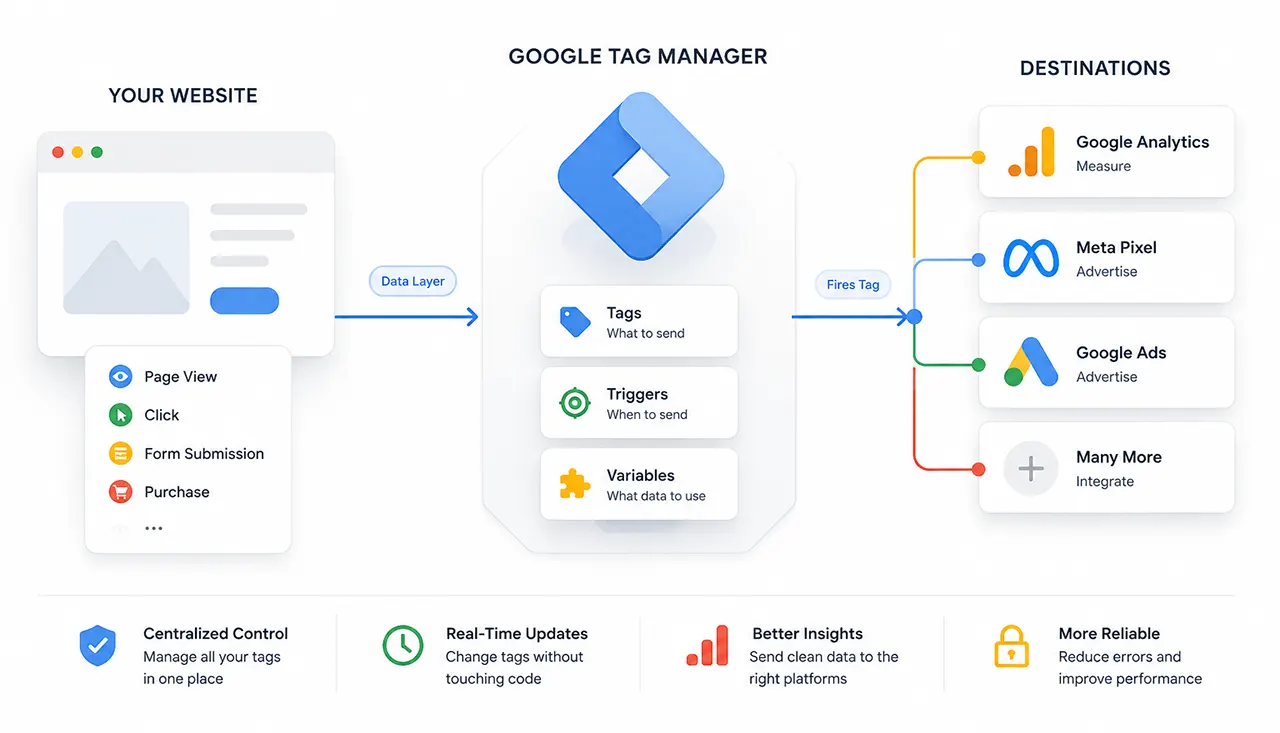
Google Tag Manager (GTM) is a free tag management system that lets you add and update tracking codes on your website without editing source code. It works through three core components: Tags (the tracking codes), Triggers (the conditions that fire tags), and Variables (the data points that provide context). When a user visits your site, GTM’s container loads, listens for specified user interactions, and fires the appropriate tags when triggers are matched – all without requiring developer intervention for every change.
What Is Google Tag Manager, Really?
Let’s start with what Google Tag Manager isn’t: it’s not a tracking tool. It doesn’t collect data or generate reports. It’s a delivery system.
Think of GTM as a translator between your website and every marketing, analytics, and advertising tool that wants to know what your users are doing. Instead of hard-coding a separate tracking snippet for Google Analytics, Meta Pixel, Hotjar, and Google Ads into your website’s code and then having to edit that code every time you want to change something, GTM handles all of those tracking scripts from a single dashboard.
The technical definition: Google Tag Manager is a free tag management system that allows you to deploy and manage marketing tags without modifying your website’s source code every time you need to add, update, or remove a tracking script. When GTM is installed on your site, you add just two code snippets to your website pages. Once those snippets are in place, you can manage everything else through GTM’s web interface.
Here’s the common misconception: people think GTM sends data to Google. It doesn’t. GTM routes data. When a user triggers a tag, GTM injects the appropriate code snippet into the page, and that snippet sends the data to its destination, whether that’s Google Analytics, Facebook, or your CRM platform. GTM is the post office, not the recipient.
How Google Tag Manager Actually Works Behind the Scenes
When someone visits your website, a remarkable sequence of events unfolds, most of it invisible to the user, and much of it misunderstood even by marketers who use GTM every day.
Here’s what actually happens, step by step:
Step 1 – The Container Loads
Your GTM container is the piece of JavaScript that loads on every page of your site. When a user’s browser hits your page, the GTM container snippet executes and establishes a connection between your website and Google’s Tag Manager servers. This container holds your tags, triggers, variables, and related configuration.
Step 2 – The Data Layer Initializes
This is where the magic happens. The data layer is a JavaScript array (window.dataLayer) that acts as a queue and a shared memory space. It’s the bridge between your website’s events and GTM’s tags.
When the page loads, the data layer is initialized. Any data you want to capture-page type, user ID, product details, transaction information – gets pushed into this array. GTM continuously monitors the data layer, waiting for new information.
Step 3 – Listeners Activate
GTM’s listeners are event handlers that watch for specific user interactions: page views, link clicks, form submissions, scroll depth, video engagement, and hundreds of other possible actions. When a user performs one of these actions, GTM detects it.
Step 4 – Trigger Evaluation
This is the decision point. When GTM detects an interaction, it checks all the triggers you’ve configured. Each trigger has conditions that must be met for a tag to fire. For example, a trigger might be configured to fire on “All Pages” or only when the URL contains “/checkout/”.
GTM checks if the action matches any trigger’s conditions. If yes, the associated tag is queued to fire. If not, nothing happens.
Step 5 – Tag Execution
When a tag fires, GTM injects the tag’s code snippet into the page. This code executes and sends the appropriate data to its destination: a GA4 pageview hit, a Meta Pixel conversion event, a Hotjar session recording, etc.
Step 6 – The FIFO Queue and Timing
Here’s the part most guides skip: the data layer operates as a First-In-First-Out (FIFO) queue. Events are processed in the order they were pushed. This is critical for understanding why timing matters in GTM implementations.
When you use dataLayer.push(), you’re not sending data immediately. You’re adding an event to a queue. GTM processes events from this queue one by one. If you push an ecommerce event after the pageview tag has already fired, the ecommerce data won’t be attached to that pageview; it arrives too late.
The Data Layer: GTM’s Secret Ingredient
The data layer is probably GTM’s most misunderstood component. Most guides describe it technically: “a JavaScript array that stores data.” That’s accurate but misses the strategic point.
The data layer is a decoupling mechanism. It separates:
- What happened (the user’s action)
- Who wants to know (which tags should receive that information)
Before GTM, tracking code was scattered throughout your website’s HTML. Every tool required its own snippet, making updates risky and time-consuming.
The data layer changed this by creating a single source of truth. Your website pushes user actions into the data layer, and GTM’s tags read from that data layer to determine what to do. This means your website code and your tracking configuration are independent. You can change what you track without touching your website’s source code.
Without the data layer, GTM wouldn’t work. It’s the architectural innovation that makes tag management possible.
Tags – The “What” of GTM
Tags are the actual tracking code snippets. They’re the “what” of GTM, what you want to do with your data.
Every tag serves a specific purpose:
- Google Analytics 4 Configuration tag – Sets up GA4 on your site
- Google Ads Conversion tag – Tracks conversions from Google Ads campaigns
- Meta Pixel tag – Sends data to Facebook/Meta for ad targeting and measurement
- Custom HTML tag – Runs any JavaScript you want
- Custom Image tag – Fires pixel-based tracking
When you create a tag in GTM, you’re essentially saying: “When these conditions are met, run this code.”
The tag configures what code runs and where the data goes. You can create tags for virtually any platform – GTM supports hundreds of built-in integrations and the Community Template Gallery provides even more.
Triggers – The “When” of GTM
Triggers define the conditions under which a tag fires. They answer the question: “When should this code execute?”
Common trigger types include:
- All Pages – Fires on every page load
- Page View – Specific URL conditions
- Click – Link clicks or element clicks
- Form Submission – When a form is submitted
- Scroll Depth – When a user scrolls a certain percentage
- Custom Event – Any event you push to the data layer
Every tag must have at least one trigger. Without a trigger, GTM has no idea when to execute the tag’s code.
If you want a tag to fire on every page of your site, you’d create a Page View trigger with the condition “All Pages.” If you want a conversion tag to fire only when a user reaches the order confirmation page, you’d create a Page View trigger with the condition “Page Path contains /order-confirmation/.”
Variables – The “How Much” of GTM
Variables provide the context that makes tags and triggers useful. They’re the additional information GTM needs to execute accurately.
The Google Tag ID (G-XXXXXXXX) is a classic example. Instead of entering your GA4 measurement ID into every single tag, you can create a variable called “GA4 ID” that stores it once. Then every GA4 tag simply references the variable. Change your measurement ID once, and all your tags update automatically.
Common variable types include:
- Constant – A fixed value you define (like your GA4 Measurement ID)
- Page URL – The full URL of the current page
- Page Path – The URL path without domain
- Click ID/Class/Text – Details about clicked elements
- Data Layer Variable – Any value pushed to the data layer
Variables enable powerful, flexible tagging. You can use variables to create dynamic tags that behave differently based on page type, user behavior, or environmental conditions.
The Three in Harmony
Here’s how tags, triggers, and variables work together in a real scenario:
- You create a GA4 Event tag
- You configure the tag’s variables: the GA4 Measurement ID (stored as a constant variable) and the event parameters
- You assign a trigger- say, “Form Submission” with a condition that the form ID is “newsletter-signup”
- When a user submits that specific form, GTM detects the form submission, checks the trigger conditions, finds a match, and fires the GA4 Event tag
- The tag executes, sending the event data to GA4 with all the context variables provide
What Can You Actually Track With GTM?
GTM can track almost any user interaction you can describe- and that specificity is what makes it so powerful. Here are some practical examples of what’s possible:
Page tracking:
- Page views with custom dimensions (user type, page category, content author)
- Virtual page views in Single Page Applications (SPAs)
- Cross-domain tracking across multiple websites
User behavior:
- Scroll depth (25%, 50%, 75%, 100%)
- Time on page
- Outbound link clicks
- File downloads
- Video plays, pauses, and completions
Form interactions:
- Form submissions
- Form abandonment
- Individual field engagement
Ecommerce:
- Product impressions and views
- Add to cart and remove from cart
- Checkout steps
- Purchases with line-item details
- Transaction tracking with revenue data
Technical events:
- 404 error pages
- JavaScript errors
- CTA button clicks
- Navigation menu usage
One of GTM’s strengths is its flexibility. The Community Template Gallery provides templates for hundreds of third-party tools, from A/B testing platforms to CRM systems.
But here’s what most guides don’t mention: not all tracking should live in GTM. The data layer approach gives you a better architecture for complex tracking. For sophisticated ecommerce implementations, pushing custom events directly to the data layer through your site’s code is cleaner and more reliable than relying on GTM’s DOM-based triggers, which can be error-prone or slow. GTM was designed as a tag management system, not a full tracking framework.
Does GTM Slow Down Your Website?
The honest answer: it depends on how you use it.
An empty GTM container has minimal impact on page load speed. But once you start adding tags, triggers, and variables, the performance picture gets more complex.
The HTTP Archive, which tracks real-world web performance data, shows that websites with GTM installed often have good Core Web Vitals scores for Cumulative Layout Shift– nearly 86% of GTM-equipped origins pass the CLS threshold on mobile as of May 2026. This suggests that GTM itself doesn’t inherently cause layout shifting issues.
But performance isn’t just about page load time. It’s also about how GTM behaves over the course of a user’s session.
Here’s the surprising finding from real-world testing: the biggest performance problem in GTM isn’t the tags themselves – it’s data layer bloat over time. In Single Page Applications (SPAs), where users navigate without full page reloads, the data layer accumulates entries as users browse. A session that starts with 35 data layer entries can grow to over 300 entries. GTM execution time increases by roughly 90% over realistic session lengths. Some tags that execute in 100ms on page load can take over 2 seconds to run after extended browsing.
The fix? Strategic data layer resets between virtual pageviews. A simple window.dataLayer.push(function() { this.reset(); }) executed at the right moment can reduce heavy tag execution times by 79% to 92% in production environments.
The broader lesson: GTM performance management is less about the number of tags and more about state management over time. Test everything, ship what actually improves user experience, and be honest about what doesn’t.
Other practical performance considerations include:
- Delaying non-critical tags to allow your site to render faster (tag sequencing)
- Using server-side tagging to move processing from the browser to your own server
- Auditing your container regularly to remove unused tags and variables
What Can You Actually Track With GTM?
GTM can track almost any user interaction you can describe – and that specificity is what makes it so powerful. Here are some practical examples of what’s possible:
Page tracking:
- Page views with custom dimensions (user type, page category, content author)
- Virtual page views in Single Page Applications (SPAs)
- Cross-domain tracking across multiple websites
User behavior:
- Scroll depth (25%, 50%, 75%, 100%)
- Time on page
- Outbound link clicks
- File downloads
- Video plays, pauses, and completions
Form interactions:
- Form submissions
- Form abandonment
- Individual field engagement
Ecommerce:
- Product impressions and views
- Add to cart and remove from cart
- Checkout steps
- Purchases with line-item details
- Transaction tracking with revenue data
Technical events:
- 404 error pages
- JavaScript errors
- CTA button clicks
- Navigation menu usage
One of GTM’s strengths is its flexibility. The Community Template Gallery provides templates for hundreds of third-party tools, from A/B testing platforms to CRM systems.
But here’s what most guides don’t mention: not all tracking should live in GTM. The data layer approach gives you a better architecture for complex tracking. For sophisticated ecommerce implementations, pushing custom events directly to the data layer through your site’s code is cleaner and more reliable than relying on GTM’s DOM-based triggers, which can be error-prone or slow. GTM was designed as a tag management system, not a full tracking framework.
Does GTM Slow Down Your Website?
The honest answer: it depends on how you use it.
An empty GTM container has minimal impact on page load speed. But once you start adding tags, triggers, and variables, the performance picture gets more complex.
The HTTP Archive, which tracks real-world web performance data, shows that websites with GTM installed often have good Core Web Vitals scores for Cumulative Layout Shift – nearly 86% of GTM-equipped origins pass the CLS threshold on mobile as of May 2026 . This suggests that GTM itself doesn’t inherently cause layout shifting issues.
But performance isn’t just about page load time. It’s also about how GTM behaves over the course of a user’s session.
Here’s the surprising finding from real-world testing: the biggest performance problem in GTM isn’t the tags themselves – it’s data layer bloat over time. In Single Page Applications (SPAs), where users navigate without full page reloads, the data layer accumulates entries as users browse. A session that starts with 35 data layer entries can grow to over 300 entries. GTM execution time increases by roughly 90% over realistic session lengths. Some tags that execute in 100ms on page load can take over 2 seconds to run after extended browsing.
The fix? Strategic data layer reset between virtual pageviews. A simple window.dataLayer.push(function() { this.reset(); }) executed at the right moment can reduce heavy tag execution times by 79% to 92% in production environments.
The broader lesson: GTM performance management is less about the number of tags and more about state management over time. Overloading GTM with 300–400 tags can slow page load, block the main thread, and make debugging nearly impossible. Test everything, ship what actually improves user experience, and be honest about what doesn’t.
Other practical performance considerations include:
- Tag sequencing – Delay non-critical tags to allow your site to render faster
- Server-side tagging – Move processing from the browser to your own server (more on this below)
- Regular audits – Remove unused tags, triggers, and variables from your container
- Mobile-first testing – Mobile users feel performance hits more acutely; test your GTM setup on mobile devices
GTM vs. GA4 – What’s the Difference?
This is one of the most common points of confusion-and understandably so, since both tools come from Google and are often used together.
Here’s the simple distinction: GTM deploys the fishing rod; GA4 catches the fish.
Google Analytics 4 helps you answer questions like “How many visitors did I get?” and “Which pages are most popular?” . It collects data about user behavior, processes it, and presents it in reports.
Google Tag Manager, on the other hand, is a delivery mechanism. It deploys the GA4 tracking code to your site and can fire additional events (like button clicks or form submissions) that GA4 then reports on.
How they work together:
- You create a GA4 Configuration tag in GTM
- You link it to your GA4 Measurement ID (the G-XXXXXXXX code)
- You set the trigger to “All Pages”
- You publish the container
- GTM injects the GA4 code into every page of your site
- GA4 collects and reports on the data
This integration gives you two advantages:
- Separation of concerns – You can update your GA4 configuration through GTM without touching website code
- Enhanced tracking – You can fire GA4 events (like “add_to_cart” or “begin_checkout”) directly through GTM triggers
The pair works well inside Google’s ecosystem, but if you’re exploring privacy‑centric setups, there are alternative approaches like server-side tagging or platforms like Matomo.
Should You Use Google Tag Manager?
The short answer: if you have a website and you care about data, the answer is almost always yes – but the setup matters more than the decision.
GTM is ideal for:
- Non-technical marketers who want to add tracking without waiting for developers
- Teams using multiple marketing platforms – Google Ads, Meta Pixel, LinkedIn Insight, Hotjar, and dozens more
- Businesses that frequently change campaigns – GTM makes tag updates quick and low-risk
- Any site with Google Analytics installed – GTM provides a cleaner implementation path
GTM might NOT be the right fit if:
- You have a simple site with basic analytics needs – the learning curve may not be worth it
- You lack technical resources for proper setup – GTM requires correct initial implementation; mistakes can corrupt your data
- Your site is small with rare changes – the overhead may outweigh the benefit
- You’re in a highly regulated industry with strict data governance requirements – you may need server-side tagging or a purpose-built solution for stricter control over data flow, rather than the default client-side setup
The real cost of GTM isn’t the tool – it’s the learning curve. Many marketers underestimate how much time it takes to:
- Understand the data layer conceptually
- Debug tag firing issues
- Maintain a clean workspace
- Document what each tag does
But once you’ve climbed that curve, GTM pays for itself many times over. It saves developer time, reduces deployment risk, and gives marketing teams the flexibility to respond to new opportunities quickly. More tags don’t necessarily mean better tracking- track business goals, not vanity metrics, and keep your GTM container lean, structured, and documented.
Setting Up GTM – What You Actually Need to Know
Setting up Google Tag Manager involves two distinct phases: the technical installation and the configuration workflow. Getting the installation right is critical – mistakes here mean no data flows, no matter how sophisticated your tags become.
Phase 1 – The Two Code Snippets
GTM requires two snippets of code on every page of your website: a JavaScript snippet placed in the <head> section and a <noscript> iframe placed immediately after the opening <body> tag .
Why both matter: The JavaScript snippet ensures GTM loads as early as possible, allowing it to fire tags efficiently and capture data immediately when the page starts loading. The <noscript> iframe serves as a backup for users with JavaScript disabled, ensuring GTM can still load and function in a limited capacity .
Critical placement rules:
- Place the first snippet as the first element after the opening
<head>tag – not inside any other HTML element - Place the second snippet immediately after the opening
<body>tag - The data layer must be defined above the container snippet; variables pushed to the data layer after the container snippet won’t be able to fire tags on page loads with matching conditions
A note on CMSes: If you’re using WordPress, Shopify, Wix, or other website builders, there are dedicated plugins or fields within theme settings to insert these code snippets easily . Many CMSes automatically inject scripts into the header and body, which can unintentionally push your GTM code out of its required position and trigger tracking issues .
Phase 2 – Your First Tag and Trigger
Once GTM is installed, you’ll create your first tag – most likely a Google Analytics 4 Configuration tag. The process:
- Go to your GTM workspace and click “New Tag”
- Enter a descriptive name (e.g., “GA4 Configuration”)
- In Tag Configuration, select “Google Tag”
- Enter your GA4 Measurement ID (the G-XXXXXXXX code)
- For triggering, select “Initialization – All Pages” – this ensures the GA4 tag fires before other tags that depend on it
- Save, test, and publish
A critical workflow detail: GTM Preview mode tests your workspace draft – not the published container. If you make changes, test them in Preview, see them working, and then forget to publish, your production site will continue using the old container version. This is the single most common reason tags fire in Preview but not in production .
Phase 3 – Testing Before Publishing
Always use Preview Mode before publishing changes. The Preview environment opens your website in a new tab with a debugging parameter appended to the URL, showing every tag, trigger, and variable in your workspace with their firing status .
What Preview doesn’t test: It doesn’t replicate the effect of ad blockers, doesn’t accurately simulate consent mode behavior in all cases, and runs in your browser with your cookies and login state – none of which may represent actual users .
Preview Mode’s limitation: A green checkmark in Preview means the tag fired in the debugging environment- it doesn’t guarantee the tag will fire in production, that the data payload is correct, that GA4 will accept and process the data, or that the data will survive GA4’s processing pipeline to appear in reports .
The Next Evolution – Server-Side Tagging
Client-side tagging is how most people use GTM: tags run in the user’s browser, sending data directly to third-party endpoints. Server-side tagging is a fundamentally different architecture that moves tag instrumentation from the browser to a server you control .
How it works: In server-side tagging, two containers are involved. A web container on your site captures user interactions and dispatches them as HTTP requests to a server container. That server container – running on Google Cloud Platform or another environment – processes those requests, applies tags, triggers, and variables, and routes data to its final destination .
Why server-side matters:
- Improved performance: The browser executes less code and dispatches fewer HTTP requests. Instead of sending multiple requests to different third-party endpoints, the client generates one request per event to the server container, which then handles vendor-specific requests .
- Better data privacy: When using client-side tagging, the user’s browser communicates directly to third parties, which can make it challenging to control what information gets shared. Server-side tagging gives you full control over the data distributed to third parties – you can remove personally identifiable information before passing it on .
- First-party context: When your server container operates in a first-party context, website data and cookies stay within your domain. Vendors can’t access third-party cookies, and you can implement tighter content security policies .
Cost considerations: The default Google Cloud Platform deployment is free in most cases, but high traffic volumes may incur costs. Once you upgrade to production configuration, expect to spend approximately $40 per server per month (USD), with a minimum of three servers recommended for redundancy .
When to consider server-side tagging: This evolution makes sense for websites with high traffic, strict privacy requirements, or complex tag ecosystems. It’s not necessary for most small to medium sites, but understanding its existence positions this guide as comprehensive and forward-thinking.
Common GTM Mistakes (And How to Avoid Them)
Even experienced marketers make these mistakes. Here’s what to watch for:
1. Testing in Preview But Forgetting to Publish
Preview mode tests your workspace draft. Production users receive the published container. If you see tags working in Preview but not in production, check if you’ve published your changes .
Fix: Develop a habit: every time you make a change, Preview it, then immediately Publish.
2. Misplacing the Container Snippet
The GTM container snippet must be placed immediately after the opening <body> tag – not inside any other HTML element. Placing it in a hidden iframe or within another tag management system can prevent certain tags from accurately tracking the parent page.
Fix: Use Tag Assistant to verify your implementation is correct. If Tag Assistant reports “Non-standard implementation,” reinstall the snippet from your GTM account and paste it in the correct location .
3. Using Dots in Data Layer Key Names
Google discourages using dots in data layer key names (e.g., dataLayer.push({"one.two": 3})). This may cause issues with tag execution .
Fix: Use underscores or camelCase instead: dataLayer.push({"one_two": 3}).
4. Incorrect Measurement ID
GA4 tags require the correct Measurement ID (starting with G-). If your tag uses a variable for the Measurement ID and that variable resolves incorrectly, data may land in a different GA4 property .
Fix: Double-check your Measurement ID in your GA4 property settings and verify the variable resolves correctly in both Preview and production environments.
5. Firing Order Dependencies
GA4 event tags depend on the GA4 configuration tag firing first. If the configuration tag’s trigger doesn’t fire before your event tag, the event won’t be sent .
Fix: Use tag sequencing to ensure the configuration tag always fires before dependent event tags. Or use the “Initialization – All Pages” trigger.
6. Consent Mode Blocking Tags in Production
If you’ve implemented Google Consent Mode, your tags may be configured to respect the analytics_storage consent state. When users decline analytics cookies, tags that require consent won’t fire. In Preview mode, you’re typically testing from a browser where you’ve already accepted consent .
Fix: Test in an incognito window and explicitly decline consent. If tags don’t fire, consent mode is working as designed.
Frequently Asked Questions
Yes, Google Tag Manager is completely free to use. There are no usage limits, though enterprise-scale implementations may benefit from paid services like server-side hosting.
Not necessarily, but GTM significantly simplifies managing GA4 and other tracking tools. Instead of manually adding GA4 tracking code to every page of your site, you use GTM to deploy and manage it. This reduces errors and gives you greater control over your tracking setup.
No, they’re different tools that work together. GTM manages and deploys tracking codes; GA4 collects and reports analytics data. GTM is the delivery mechanism, and GA4 is the analytics platform.
A tag is the tracking code you want to run. A trigger defines when that tag should fire (e.g., on page load, on click). A variable provides additional context – data that GTM needs to make the tag work correctly (like the Measurement ID, Page URL, or Click ID).
Use the Tag Assistant extension or GTM’s Preview mode. If the Preview mode shows your workspace tags firing as expected, your installation is correct. Also check that the GTM snippet is the first element after your opening <head> and <body> tags.
Yes, but it depends on how you use it. An empty GTM container has minimal impact, but a container with many tags, triggers, and variables can slow page load. Using server-side tagging can reduce the processing load on the browser.
This is often because you haven’t published your changes. Preview mode tests your workspace draft, not the published container. Other common causes include Consent Mode blocking tags, ad blockers, and incorrectly configured Measurement IDs.
GTM is evolving toward server-side tagging, which moves tag processing from the browser to the server. This improves performance, privacy, and data quality. Consent Mode integration, enhanced conversions, and automated privacy-compliant tracking are also ongoing areas of development.
Your Next Step With Google Tag Manager
If you’ve made it this far, you understand that Google Tag Manager isn’t just a tool – it’s an architectural shift in how you manage digital measurement. The core concept – decoupling user actions from the tools that track them – is a more elegant solution than hard-coding snippets ever was.
Here’s the honest truth: setting up GTM correctly takes effort. There’s a learning curve, and you’ll make mistakes. Most people do. But once you understand the data layer, the FIFO queue, and the relationship between tags, triggers, and variables, you’ll see why GTM has become the industry standard.
Your next logical steps:
- If you haven’t already, create a GTM account and install the container snippet on your site
- Set up your GA4 Configuration tag using the “Initialization – All Pages” trigger
- Test thoroughly in Preview mode before publishing
- Add event tags for key user interactions (form submissions, button clicks, downloads)
- Regularly audit your container to remove unused tags and keep performance lean
Remember: GTM doesn’t collect data – it delivers it. You’re building a translation layer between your website and every tool that needs to understand what users do.
Invest the time to understand how GTM works at the architectural level, and you’ll find yourself making better tracking decisions, debugging issues faster, and crucially relying on developers less often for what should be simple tracking changes.